Saturday, November 29, 2008

Sauteed Cheese with Pine Nuts, Cinnamon & Amaretto

Ingredients:
12 ounces Stracchino or Taleggio cheese, well refrigerated
1/2 cup pine nuts, spread out on a plate
2 T plus 2 teaspoons unsalted butter
1/2 teaspoon ground cinnamon
3/4 cup Amaretto liqueur

Cut the cheese into 4 inch squares about ½ inch thick.

Press into the pine nuts so that the nuts adhere to one side, and set aside.

Heat a 10 inch non-stick pan over medium heat, and add 2 tablespoons butter. When the butter is sizzling, place the cheese in the pan, nut side down, and cook until golden brown on the nut side, about 3 minutes.

Remove each piece, and place on a separate plate, nut side up.

Add the cinnamon, amaretto, and remaining 2 teaspoons butter to the pan and reduce by half over high heat, about 2 minutes.

Pour the sauce over the cheese, and serve immediately.

Serves 4

Read More...

Friday, November 28, 2008

Mary Steenburgen's Cornbread

2 8 1/2-ounce boxes Jiffy corn muffin mix
1 can of whole kernel corn (15 ounces)
1 can of creamed corn (15 ounces)
2 cups of sour cream, loosened by stirring with a fork or whisk
4 large eggs, beaten
1 cup melted unsalted butter, cooled
3 cups of grated Swiss cheese

Preheat the oven to 350 degrees.

Combine all of the ingredients EXCEPT 1 cup of the cheese in the following order (mixing as you go) in a large mixing bowl: eggs, sour cream, creamed corn, whole kernel corn, Swiss cheese, chives (if using), corn muffin mix.

Pour batter into a lightly greased 9-inch by 13-inch baking dish.

Bake for 35 minutes.

Sprinkle the rest of the Swiss cheese on top and bake for another 10 minutes, or until the cheese has melted.

Insert toothpick. If it comes out clean, it’s done.

Variation: Add up to 1/2 cup of minced chives to the first step.

Read More...

Thursday, November 27, 2008

Mocha Chocolate Pecan Pie


For the crust:
1¼ cups all purpose flour
1 tablespoon grated orange peel
1 teaspoon sugar
¼ teaspoon salt
¼ cup (½ stick) chilled unsalted butter, cut into small pieces
¼ cup solid vegetable shortening, cut into small pieces
1 tablespoon orange juice
2 tablespoons (about) ice water

For the filling:
3 tablespoons unsalted butter
3 tablespoons unsweetened cocoa powder
1 tablespoon whipping cream
2 teaspoons instant espresso powder or instant coffee powder
1 cup light corn syrup
1 cup sugar
3 large eggs
2 teaspoons vanilla extract
¼ teaspoon salt
1½ cups coarsely chopped pecans (about 6 ounces), lightly toasted
1 cup pecan halves

3 ounces, approximately, of a good quality dark chocolate (semi- or bittersweet, Valrona or Scharffenburger)

Preparing the crust:
Combine first 4 ingredients in processor. Using on/off turns, cut in butter and shortening until mixture resembles coarse meal. Blend in orange juice and enough water by tablespoonfuls to form moist clumps.

Gather dough into ball; flatten into disk.

Wrap in plastic and chill 1 hour.

(Can be prepared 1 day ahead. Keep refrigerated. Soften dough slightly at room temperature before rolling.)

Preheat oven to 350° F.

Roll out dough on lightly floured surface to 12-inch-diameter round.

Transfer to 9-inch-diameter glass pie dish. Trim edges and crimp decoratively. Freeze 15 minutes.

Line crust with foil; fill with dried beans or pie weights. Bake 15 minutes.

Remove foil and beans.

Bake crust until pale golden, about 10 minutes.

Cool on rack.

Preparing the filling:
Melt butter in heavy small saucepan over medium heat. Stir in cocoa, then cream and espresso powder. Pour into large bowl.

In a separate bowl, combine corn syrup, sugar, eggs, vanilla and salt; whisk until well blended. Stir in toasted pecans. Pour filling into pie crust. Place non-toasted pecan halves in a circular pattern on top, pressing down slightly into the filling.

Bake until puffed and set, about 1 hour. Transfer to rack and cool completely.

After the pie has cooled to room temperature, melt chocolate in a microwave and pipe or drip it (with a piping cone, ziplock bag with tip cut off, or a fork) decoratively over the top of the pie.

Can be made 1 day ahead. Cover and let stand at room temperature.

Serve with whipped cream.

Read More...

Wednesday, November 26, 2008

Cranberry Moutarde Relish


Ingredients:
3 cups sugar
1 1/2 cups water
2 vanilla beans
1 orange, zested and juiced
3 (12-ounce) bags fresh or frozen cranberries
gray salt
freshly ground black pepper
3 T Dijon mustard

Preparing the relish:
In a large saute pan combine the sugar and water and boil to form a syrup. Add the vanilla beans and orange zest and simmer briefly. Add the orange juice, cranberries and season with salt and pepper. Simmer until the cranberries start to pop, about 3 to 5 minutes. Remove from heat and add mustard. Cool to room temperature before serving, refrigerate leftovers.

Prepare at least one day in advance.

Read More...

Tuesday, November 25, 2008

Lidia's Caesar Salad

Pick the youngest, crunchiest Romaine lettuce you can find. Keep them crisp, before and after cleaning in the vegetable drawer of the refrigerator. Even if you pick, young, crispy lettuce, you should use only the pale green and yellow, inner leaves for this salad. But don’t throw out the outer leaves. Shred them and stir them into soups or into a panful of sauteed fresh peas.

2 cups firm-textured white bread cubes (½ x ½-inch)
3 young, firm heads Romaine lettuce, or one 18-ounce package hearts of romaine
2 T fresh lemon juice
2 T red wine vinegar, plus more for dressing the salad
4 garlic cloves
4 anchovy filets
⅓ cup extra virgin olive oil, or as needed
1 T Dijon mustard
1 hard boiled egg yolk (see page 000)
½ teaspoon salt
½ teaspoon Worcestershire sauce
freshly ground pepper
1 cup grated Parmigiano-Reggiano cheese, plus a block of Parmigiano Reggiano for shaving

Preparing the croutons:
Heat the oven to 350° F. Spread the bread cubes out on a baking sheet and bake, tossing them once or twice so they cook evenly, until golden brown, about 12 minutes. Remove and cool. (The croutons may be prepared up to a day in advance. If necessary, recrisp them in a 350 F oven for a few minutes.)

Another little touch that looks nice on a plate is to set one or two whole Romaine leaves on the plate and pile the cut leaves over it. Shaving Parmigiano-Reggiano over the finished salad looks nice and tastes nice, too.

Traditionally, Caesar Salad was made with a barely cooked egg. For safety reasons, use a hard-boiled egg.

Preparing the greens:
If using whole heads of romaine lettuce, remove the darker outer leaves to expose the pale green center. Reserve the outer leaves for another use, if you like. Cut the out the core and separate the hearts of romaine into individual leaves. Wash the leaves in a sink of cool water and drain them well, preferably in a salad spinner. Place the leaves in a large bowl, cover them loosely with damp paper towels and store in the refrigerator up to 8 hours.

Preparing the dressing:
Combine 2 tablespoons vinegar, the lemon juice, garlic and anchovies in a blender or work bowl of a food processor. Blend until smooth, adding some of the ⅓ cup olive oil if there isn’t enough liquid to move the mixture around the blender jar. Add the mustard, hard-boiled egg yolk, salt, Worcestershire sauce, pepper and remaining olive oil if any. Blend until is smooth and creamy. Taste the dressing: If it’s a little too tangy, pour in a splash or two of olive oil and blend until it’s incorporated.

The dressing shouldn’t be too dense; it should be just thick enough to coat each leaf lightly. The cheese that is added at the end will thicken it a little. Oil and vinegar stirred in at the end is a little touch of mine.

Putting it all together:
Stack the leaves in a large, preferably wooden serving bowl.

Pour the dressing over the salad, add a splash of vinegar and a healthy splash of olive oil and toss until all the leaves are coated with dressing. Toss in the croutons and ground black pepper to taste.

Lastly, so it doesn’t clump, sprinkle the grated cheese over the salad, tossing as you add. Serve on chilled plates and, with a vegetable peeler, shave some of the block of Pamigiano-Reggiano over each serving.

Serves 6

Read More...

Monday, November 24, 2008

Stuffed Sweet Potatoes with Pecan and Marshmallow Streusel

Ingredients:
12 large sweet potatoes
3/4 cup (1 1/2 sticks) unsalted butter, at room temperature
3/4 cup light brown sugar
3/4 cup all purpose flour
1/4 teaspoon ground cinnamon
1/4 teaspoon salt
1 cup toasted pecan pieces
1 cup miniature marshmallows

Preparing the sweet potatoes:
Preheat the oven to 400 degrees F.

Wash the sweet potatoes, scrubbing them well to remove any dirt.

With a fork, prick the sweet potatoes in a couple of spots and place them on a sheet pan. Bake for about 45 minutes, or until a knife inserted in the center goes in easily.

In a large bowl, mix the butter, brown sugar, and flour together until it’s crumbly-looking.

Add the cinnamon, salt, pecans, and marshmallows; fold the streusel topping together to combine.

Slice the sweet potatoes lengthwise down the center and push the ends towards the middle so it opens up.

Stuff the sweet potatoes generously with the streusel topping.

Return to the oven. Bake for another 20 minutes, or until the topping is bubbly and brown.

Read More...

Sunday, November 23, 2008

Cornbread with Honey Butter

For cornbread:
½ cup vegetable oil
1 cup sugar
2 eggs
2½ cups water
2½ cups all-purpose flour
1 cup pastry flour
½ cup powdered milk
2 T baking powder
1 T salt
1 T vanilla
1 cup yellow cornmeal

For honey butter:
⅓ cup honey
⅓ lb. unsalted butter, softened

Cornbread:
Preheat oven to 400 degrees F.

Grease 9X13" baking pan. Set aside.

In a large bowl blend together oil, sugar and eggs for two minutes.

Add 2 cups of the water and mix until blended with sugar mixture.

Add flours, powdered milk, baking powder, salt and vanilla. Mix ten minutes at low speed.

Add remaining ½ cup water and cornmeal. Mix five minutes more.

Pour into prepared pan. Bake 40 to 50 minutes or until golden brown and tester comes out clean.

Serve with Honey Butter.

Honey Butter:
Beat honey into softened butter until blended.

Refrigerate in small molds or serve in bowls.

Serves 12

Read More...

Saturday, November 22, 2008

Cranberry Sauce with Roasted Shallots & Port

Ingredients:
18 large shallots, peeled, quartered lengthwise through root end
1 T vegetable oil
5 teaspoons minced fresh thyme
5 T balsamic vinegar
1 T plus 1/2 cup sugar

1 2/3 cups ruby Port
1/3 cup (packed) golden brown sugar
1 12-ounce bag cranberries
1/4 cup dried currants
1 T chopped fresh marjoram


 * * * * * * *

Preparing the cranberry sauce:
Preheat oven to 400 degrees F.

Toss shallots with oil and 3 teaspoons thyme on small rimmed baking sheet. Sprinkle with salt and pepper. Bake until golden, about 25 minutes.

Mix 1 tablespoon vinegar and 1 tablespoon sugar in small bowl. Drizzle over shallots; toss to coat.

Continue roasting until shallots caramelize, stirring occasionally, about 10 minutes. Remove from oven.

Bring Port, brown sugar, 4 tablespoons vinegar, and 1/2 cup sugar to boil in heavy large saucepan over medium-high heat, stirring until sugar dissolves.

Add cranberries and currants; cook until berries pop, stirring occasionally, about 8 minutes.

Mix in marjoram and 2 teaspoons thyme. Mix in shallots. Transfer to bowl. Cover and chill overnight.

Serve cold or at room temperature.

Can be made one week ahead. Keep refrigerated.

Read More...

Friday, November 21, 2008

Soup of Many Onions

¼ cup butter
2 white onions, chopped
1 red onion, chopped
1 sweet onion, chopped
2 leeks, chopped
6 shallots, chopped
6 green onions, chopped
4 cups dark lager beer
12 fresh chives, chopped
2 T minced fresh garlic
4 cups chicken stock, preferably homemade
2 cups beef stock, preferably homemade
2 T kosher salt
½ teaspoon dried thyme, crushed
½ teaspoon ground cumin
¼ teaspoon ground coriander
2 T garlic powder

slices of toasted baguettes
shredded provolone or gruyere

Melt butter in a large soup pot. Add white onions, red onion, sweet onion, leeks, shallots, and green onions. Saute over low heat until lightly browned.

Stir in the beer. Cook until the liquid is reduced by half.

Stir in the chives, garlic, chicken broth, beef broth, salt, thyme, cumin, coriander, and garlic powder.

Simmer about 5 minutes or until onions are tender.

Ladle into individual soup bowls (on baking sheet). Float a slice of toasted baguette on top, heap cheese on top of bread and broil until melted and bubbly.

Serves 8

Read More...

Thursday, November 20, 2008

Creamed Cabbage

This is a very rich, delicious dish that is a 'must-have' at our family's Thanksgiving dinners. 3 lb. cabbage
4 T butter
½ cup of finely chopped onion
salt and pepper to taste
¼ tsp freshly grated nutmeg
1½ to 2 cups of heavy cream

Bring a large pot of water to boil.

Pull off and discard the tough outer and blemished leaves of the cabbage. Cut out the core.

Cut the cabbage into quarters. Cut each quarter into 1-inch thick slices. Cut each slice into slices 3-inches wide. Separate the cabbage pieces.

Add cut-up cabbage to pot of boiling water and cook for about 2 minutes. Drain.

In a large heavy skillet, melt the butter and add the onion and sweat until translucent.

Add the drained cabbage, salt and pepper. Sprinkle with nutmeg. Partly cover and cook about 10 minutes or until most of the liquid has evaporated.

Add cream, salt and pepper, cover and cook about 5 minutes.

Uncover and cook about 10 to 15 minutes or until the sauce has thickened somewhat and the cabbage is tender.

Read More...

Wednesday, November 19, 2008

Sour Cream Coffeecake

This is the recipe from Los Angeles Schools’ cafeterias, circa 1959.

Ingredients for the cake batter:
1 1/2 cups of cake flour
1/2 cup of all purpose flour
1 teaspoon baking soda
1 teaspoon baking powder

1/2 cup of butter
1 cup of granulated sugar

1 egg, slightly beaten
1 teaspoon vanilla
1 cup of sour cream

* * * * * * *

Ingredients for the topping:
4 T flour
3/4 cup of brown sugar
1/4 teaspoon salt
1 cup of chopped walnuts
1/4 cup of butter

Preparing the coffeecake:
Preheat the oven to 350 degrees F.

All ingredients should be at room temperature.

Mix together flours, soda and baking powder.

Cream together butter with sugar until fluffy and light.

Add eggs and vanilla and mix well.

Add half of the dry ingredients, mixing just until flour is blended. Blend in the sour cream, then remaining dry ingredients.

Spread half the batter lightly into a 10-inch tube pan.

Sprinkle with half of the topping and spread with remaining batter.

Sprinkle with remaining topping.

Bake for 40 to 45 minutes.

Read More...

Tuesday, November 18, 2008

Almond Twist Coffeecake

A round coffeecake with sixteen twists emanating from the center.

¾ cup milk
5 T unsalted butter, softened
¼ cup warm milk (110 degrees F.)
1 package dry yeast
2 eggs
⅓ cup sugar
3½ cups flour
¾ teaspoon salt
1 teaspoon vanilla

Almond Filling:
⅓ cup plus 1 T (4 ounces) almond paste
2 T brown sugar
8 T unsalted butter
⅓ cup plus 1 T flour
1 egg
½ teaspoon each lemon zest and vanilla
dash salt

Glaze:
½ cup apricot jam
1 cup powdered sugar
4 teaspoons milk
½ teaspoon vanilla
⅓ cup sliced almonds, toasted

Preparing the dough:
n a small saucepan over low heat, combine ¾ cup milk with the butter and melt. Pour into a large bowl and cool to lukewarm. Sprinkle yeast over warm ¼ cup milk; to proof yeast allow to stand 5 to 10 minutes until mixture is foamy. Add the sugar, eggs, yeast mixture, vanilla, and 2 cups flour to the lukewarm milk mixture. Using an electric mixer, beat until smooth, about 1 minute. Add the salt and the 1½ cups additional flour; beat just to form a soft dough.

Transfer dough to a floured work surface and knead about 8 minutes or until dough is shiny, elastic smooth and has small blisters on the surface. Add a bit more flour to work surface just as needed to prevent sticking. (Alternatively, if using a heavy-duty mixer with flat beater attachment, beat on medium speed rather than knead dough on work surface until dough comes together in a ball and comes away from the sides of the bowl, about 5 to 7 minutes.)

Set dough in a large bowl, cover dough’s surface with a piece of lightly oiled plastic wrap, then a cloth towel. Refrigerate overnight, if you wish, or allow to rise in a warm place until doubled in volume, about 1 to 2 hours, depending on the temperature of the room.

Preparing the filling:
Using a food processor, blend the almond paste with the sugar. Add the butter, flour, egg, lemon, vanilla and salt; process until smooth.

Forming the coffeecake:
Gently punch dough down. Divide into three equal pieces. Lightly grease a 12-inch pizza pan. On a lightly floured surface roll out one portion of dough to a circle, 12-inches in diameter. Transfer to baking pan, stretching with fingertips if necessary, to fit the dimensions of the pan. Spread the dough with half the filling. Roll out second portion of dough to a 12-inch circle and transfer it on top of the other circle. If necessary, gently stretch the dough with fingertips to fit pan shape. Spread with the remaining filling. Roll out remaining dough ball to another 12-inch circle and set it on top of the circle stack. Again if necessary, gently stretch the dough with fingertips to fit pan shape.

Invert a drinking glass about 2-inches in diameter and set it in the center of the dough circle. (Do not allow it to cut through the dough.) With the handle of a wooden spoon, lightly score the dough circle with 16 indentations. Using kitchen scissors, cut through the layers of dough, using the indentations as a guide. Begin at the edge of the dough circle and cut up to the glass to form 16 pie-shaped wedges. Gently twist each wedge 4 to 5 times, spiraling each piece of dough. Remove the glass. Loosely cover dough with a towel. Let rise in a warm place until almost doubled in volume, about 25 to 30 minutes. Adjust rack in lower third of the oven and preheat oven to 350 degrees at least 20 minutes. Bake for 30 to 35 minutes or until golden. While warm, brush with warm apricot jam. In a small bowl, blend together the powdered sugar, milk and vanilla and brush the glaze over the jam while the coffeecake is warm. Sprinkle almonds over top. With a small paring knife, cut small slits in the pastry to allow steam to escape while baking.

Serves 16

Read More...

Monday, November 17, 2008

Caramelized Almonds


1 cup almonds
1 cup granulated sugar
1/8 cup water

Use a saucepan or pan dedicated to candy-making or sugar, as caramelized sugar staining may be hard to remove in clean-up.

Spread the sugar on the bottom of the pan, add water and bring to a boil, swirling pan carefully to dissolve the sugar. Once the sugar is translucent, lower heat just a bit and add almonds, swirling again to coat. With metal utensils (fork, spoon, spatula), stir until the moisture evaporates and the contents of the pan look like almonds in white powder. Take pan off the heat for a couple of minutes.

Place pan back over the hit, mixing constantly. The sugar will melt almost immediately (tend to this carefully!) and then caramelize. Move the pan on and off the heat to control the caramelization - It can burn in a matter of seconds. When the sugar glaze is a medium amber color, take them off the stove and pour out immediately onto a Silpat or an aluminum baking pan, spreading them out and separating with forks. Work quickly as the sugar will set up within seconds.

Read More...

Intensely Almond Cupcakes


I grind the almonds in a food processor as finely as I can without them turning into butter, and then I add the granulated sugar to the food processor for a few cycles. The sugar soaks up the moisture and helps to get a finer grind to the almonds.

I've made the batter with a KitchenAid mixer and a hand-mixer. The KitchenAid seriously cuts down the prep time, and gets my vote every time. The icing can be made easily with a hand-mixer.

For the cupcakes:
1¾ cup sour cream, divided
½ pound (2 sticks) unsalted butter, at room temperature
½ cup walnut or vegetable oil
3½ cups all-purpose flour
1 teaspoon baking powder
1 teaspoon baking soda
½ teaspoon salt
2 cups granulated sugar
⅔ cup almonds, toasted and ground
4 large eggs, at room temperature
2 teaspoons almond extract
1 teaspoon vanilla extract

For the frosting:
3 cups confectioners’ sugar
2 teaspoons almond extract
3 T hot water

Preparing the cake:
Preheat the oven to 325°F.

Line a medium cupcake pan with liners.

In a bowl cream 1 cup sour cream, the butter, and the oil.

In a separate bowl sift together the flour, baking powder, baking soda, and salt. Stir in the sugar and almonds.

Add the dry ingredients to the creamed butter mixture in three additions. Mix thoroughly after each addition.

In another bowl mix the eggs, ¾ cup sour cream, almond extract, and vanilla extract.

Add the egg mixture to the batter in three additions, beating for 1 minute after each addition.

Fill the cupcake liners three-quarters full with batter. Bake for 20-25 minutes or until a toothpick inserted in the center of a cupcake comes out clean. Cool cupcakes in the pan.

Preparing the frosting:
Mix together the confectioners’ sugar, almond extract, and hot water.

Beat to desired spreading consistency. You may need to add more water or sugar.

Garnish with caramelized almonds, if desired.

Read More...

Sunday, November 16, 2008

Turkey Pot Pie

1¾ cups flour, divided
3 T chopped fresh herbs (a mixture of parsley, chives, tarragon and chervil)
kosher salt
scant ½ teaspoon sugar
9 T chilled butter (1 stick plus 1 tablespoon), divided
1 T vegetable shortening, optional
ice water
4 cups chicken broth (or homemade turkey stock), and more as needed
20 pearl onions, trimmed and peeled
3 carrots, peeled and diced into ½ -inch pieces
3 celery stalks, diced into ½ -inch pieces
12 cremini mushrooms, sliced
1½ cups diced red boiling potatoes, cut into ½ -inch cubes
2 leeks, trimmed, quartered lengthwise and diced into ½ -inch pieces
½ cup fresh or frozen peas
4½ cups chopped turkey (about 1¼ pounds), cut into 1½ -inch cubes
1 cup heavy cream
pepper
1 egg yolk, optional

In a large bowl, mix together 1½ cups flour, the herbs, a scant half-teaspoon salt and the sugar.

Cut 6 tablespoons (three-fourths stick) butter into one-half-inch pieces and, with a pastry cutter, two knives or your fingers, quickly work the butter (and optional shortening) into the flour until it is reduced to pea-sized pieces.

Sprinkle ice water, 1 tablespoon at a time and no more than 5, into the mixture and fluff with a fork until the dough is just moist enough to gather into a ball. Do not overwork the dough.

Flatten the ball into a disk and cover tightly with plastic wrap. Refrigerate at least 30 minutes to chill thoroughly.

Meanwhile, in a large saucepan, bring the broth to a simmer over high heat. Reduce the heat to maintain a bare simmer. Add the onions and poach for 2 minutes. Stir in the carrots, celery, mushrooms and potatoes and cook at a gentle simmer until crisp-tender, about 10 minutes. Add the leeks and peas for the last half minute of simmering.

Drain the vegetables, reserving the broth. Place the vegetables in a 2½ -quart baking dish and add the turkey, stirring gently to combine evenly.

Measure the broth, adding additional if needed to bring the volume to 4 cups. Place the broth back in the saucepan and reduce over high heat by half to 2 cups. Remove from heat and set aside.

Make the velouté (sauce):In a medium heavy-bottom saucepan, melt the remaining 3 tablespoons butter over medium high heat. Sprinkle the remaining one-fourth cup flour over the melted butter and cook, stirring constantly, to make a white roux, about 3 minutes. Do not let the roux color. Off heat, whisk the reduced broth into the roux, then stir in the cream and bring to a gentle boil. Cook just until the mixture coats the back of a spoon, about 3 minutes, stirring constantly. Remove from heat and season with 1 teaspoon salt and one-eighth teaspoon pepper, or to taste.

Pour the velouté over the vegetables and turkey in the baking dish, check the seasoning, and set aside. Heat the oven to 400 degrees.

On a lightly floured board or surface, roll the dough so it is large enough to cover the top of the dish with 1 inch hanging over the side. Drape the dough over the filled dish, trimming the sides to even them out. Roll up the edges and crimp over the edge to seal the pie.

If you’d like, mix the egg yolk with a teaspoon of water and brush over the crust to give it a rich sheen as it bakes.

Slit the top of the crust in a few places to allow steam to escape as the pie bakes.

Place the pie in the oven and bake for 20 minutes. Reduce the heat to 375 degrees and continue to bake until the crust is golden and the sauce is bubbling, an additional 10 to 15 minutes.

Let the pie rest for at least 15 minutes before serving. It will stay warm for quite a long time.

Read More...

Saturday, November 15, 2008

Pumpkin Pie with Toffee-Walnut Topping

Crust
1½ cups all-purpose flour
1 T sugar
½ teaspoon salt
6 T (¾ stick) chilled unsalted butter, cut into ½-inch pieces
3 T chilled solid vegetable shortening, cut into ½-inch pieces
3 T (about) ice water
1 large egg yolk, beaten to blend

Filling
1 15-ounce can pure pumpkin
⅔ cup (packed) golden brown sugar
⅔ cup whipping cream
⅓ cup whole milk
2 large eggs
¼ cup sugar
1 teaspoon vanilla extract
1¼ teaspoons ground cinnamon
¾ teaspoon ground ginger
¼ teaspoon ground nutmeg
¼ teaspoon salt
1/8 teaspoon ground allspice
½ cup walnuts, toasted, chopped
⅓ cup English toffee bits (such as Skor)

For crust:
Blend flour, sugar and salt in processor. Add butter and shortening and cut in using on/off turns until mixture resembles coarse meal. Add 2 tablespoons ice water; process using on/off turns until small moist clumps form, adding more water by teaspoonfuls if dry. Gather dough into ball. Flatten into disk. Wrap in plastic; chill 30 minutes.

Position rack in bottom third of oven and preheat to 375°F. Roll out dough on floured surface to 12-inch round. Transfer dough to 9-inch-diameter pie dish. Fold overhang under, forming high-standing rim. Crimp edges decoratively. Freeze 15 minutes. Brush crust all over with yolk. Bake until crust is set but still pale, about 15 minutes. Cool slightly.

For filling:
Whisk first 12 ingredients in large bowl. Pour into crust. Bake until filling is set, about 55 minutes. Transfer to rack. Sprinkle nuts and toffee around edge of hot pie, forming border. Cool pie completely. (Can be made 6 hours ahead. Let stand at room temperature.)

Read More...

Friday, November 14, 2008

Chocolate Chip & Nib Biscotti

2 cups all-purpose flour
2 teaspoons aniseeds
1 ½ teaspoons baking powder
¼ teaspoon salt
½ cup unsalted butter, softened
1 cup sugar
2 large eggs, at room temperature
1 T brandy
1 teaspoon vanilla extract
½ cup roasted cocoa nibs*
scant ½ cup bittersweet chocolate chips
1 cup toasted walnuts or pecans, coarsely chopped

Preheat oven to 325F. Line a heavy baking sheet with parchment paper.

Combine the flour, aniseeds, baking powder and salt in a bowl and stir to blend. In an electric mixer, cream the butter and sugar until light and fluffy. Add the eggs one at a time, blending until smooth. Add the brandy and vanilla extract. On low speed, add the flour mixture gradually, beating just until blended and scraping down the sides of the bowl once or twice. Add the cocoa nibs, chocolate chips and nuts, and mix just enough to blend.

With two soup spoons, transfer the dough to the baking sheet, shaping 3 logs, each about 14 inches long and 1½ inches wide. Space the logs as far apart as possible; they will spread in the oven. Bake until firm to the touch and lightly browned, 35 to 40 minutes. Remove logs from the oven and let stand on the baking sheet for 5 minutes, then carefully transfer them to a cutting board.

With a chef’s knife, cut ½-inch-wide slices on the diagonal. Transfer the slices to the baking sheet, cut side down (you can reuse the original parchment), and bake 15 minutes. Transfer to a rack to cool. Store in an airtight container. The biscotti are better the second day and will keep for at least 2 weeks.

Read More...

Thursday, November 13, 2008

Classic Butter Cake

This can be used as the foundation for dozens of more elaborate cakes.

Butter, for the cake pans, at room temperature
all-purpose flour, for the cake pans
2½ cups (250 grams) sifted cake flour
2 teaspoons baking powder
¼ teaspoon salt
3 large eggs, at room temperature
1 cup (8 ounces) whole milk, at room temperature
1 teaspoon vanilla
6 ounces (1½ sticks) unsalted butter, at room temperature
1½ cups (300 grams) granulated sugar

First, prepare the cake pans and oven. Put the oven rack in the lower third of the oven, 5 to 6 inches from the bottom. Preheat the oven to 350 degrees.

Cut 2 8-inch circles of parchment or wax paper.

Use a paper towel to grease the bottoms and sides of the the cake pans with butter, being sure to coat every bit of the interior of the pan. Add several tablespoons of flour and then shake and turn the pan to coat it thoroughly with flour. Tap out extra flour. Set a circle of parchment or wax paper into each pan. Set aside.

Next, prepare all the ingredients. Put the flour into a sifter, preferably a triple sifter, add the baking powder and top it with the salt. Sift the mixture onto a sheet of wax paper and set it aside.

Crack the eggs into a small bowl and use a fork to whisk together briefly, to combine the yolks and whites.

Pour the milk into a liquid measuring cup, add the vanilla and stir to combine.

Put the butter in a bowl of a heavy-duty mixer.

Using the flat beater (paddle), cream the butter on medium speed until it lightens in color, clings to the sides of the bowl and has a satiny appearance; this should take about 30 to 45 seconds.

Maintaining a medium speed, add the sugar in a slow steady stream. When all the sugar is added, stop the machine and use a rubber spatula to scrape the gritty, sandy mixture clinging to the sides into the center of the bowl. Continue to cream at the same speed for 4 to 5 minutes, until the mixture is very light in color and fluffy in appearance.

With the mixer still on medium speed, add the eggs, very cautiously and slowly, tablespoon by tablespoon, as if you were adding oil when making mayonnaise. If at any time the mixture appears watery or shiny, stop the flow of eggs and increase the mixer’s speed until a smooth, silken appearance returns. Return to medium speed and resume adding the eggs.

Continue to cream, stopping the mixer and scraping the sides of the bowl at least once. When the mixture appears fluffy, white and increased in volume -- it almost resembles whipped cream cheese and any grainy appearance has disappeared -- detach the flat beater and bowl from the mixer. (The total process of adding the eggs and incorporating them into the mixture takes 3 to 4 minuts). Tap the paddle against the edge of the bowl to free excess creamed mixture.

With the aid of a metal icing spatula, lift one-fourth of the flour mixture and sprinkle it over the creamed mixture. Stir it in with a rubber spatula. Then pour in one-third of the vanilla-flavored milk, stirring to blend together. Repeat this procedure, alternating dry and liquid ingredients, ending with the flour. With each addition, scrape the sides of the bowl, and continue mixing until smooth. (Stirring the flour in last rather than the liquid binds the batter together to form the desirable consistency. Doing this by hand rather than by machine gives more control in incorporating the ingredients and reduces the risk of overmixing.

To bake the cake, spoon equal amounts of batter into each pan, using a large kitchen serving spoon. (When all the batter has been divided, you may weigh each pan to check for equal distribution, which is required for a perfectly symmetrical cake.) With a rubber spatula, spread the batter, working from the center outward, creating a slightly raised edge around the outside rim. (Since heat is conducted faster near the metal rim, mounding the batter around the edges assures more even, level baked layers.)

Bake for 30 to 35 minutes, or until the baked surface springs back slightly when touched lightly in the center and the sides begin to contract from the pan.

To cool the cake, set the pans on racks and let them cool for 5 to 10 minutes.

Using mitts, tilt and rotate each pan, gently tapping on the counter to see if each layer is being released from the metal sides. If not, or if in doubt, run a small metal spatula or the thin blade of a table knife between the layer’s outer edge and the metal rim, freeing the sides and allowing air to get under each layer as it is rotated.

Cover one of the layer cakes with a cooling rack, invert it onto the rack and carefully lift the pan to remove.

Slowly peel off the paper liner, turn the paper over so that the sticky top side faces up and reposition it on top of the cake. Cover with another rack, invert the layer right side up and remove the original rack. (Reusing the liner in this way prevents the layer from sticking to the rack while it cools and also provides a temporary base for lifting and storing.) Repeat with the second layer. Allow both layers to cool completely.

If you will use the cake within 24 hours, wrap the layers individually in plastic wrap and store at room temperature.

Variations:
For a Red Velvet Butter Cake, reduce the amount of milk by 2 tablespoons and replace it with 2 tablespoons of red food coloring.

For a Red Velvet Butter Cake with Chocolate, which is traditional in some regions, add 2 to 3 tablespoons unsweetened cocoa powder (not Dutch) to the flour mixture, adding it to the sifter after the flour and before the baking soda.

Makes one 8-inch cake

Read More...

Sunday, November 9, 2008

Brown Sugar Pound Cupcakes with Brown-Butter Glaze

For the cupcakes:
3 cups sifted all-purpose flour
2 teaspoons baking powder
½ teaspoon salt
8 ounces (2 sticks) unsalted butter, softened
2¼ cups packed light-brown sugar
4 large eggs, room temperature
¾ cup buttermilk

For the glaze:
4 ounces (1 stick) unsalted butter
2 cups sifted confectioners’ sugar
2 teaspoons pure vanilla extract
2 to 4 T whole milk
½ vanilla bean

Garnish:
29 whole pecans, roasted

For the cupcakes:
Preheat oven to 325 degrees. Make cupcakes as directed in Basic Cupcake How-To, using buttermilk for wet ingredient. Fill each cup ¾ full, and bake for 25 minutes.

Set rack with cupcakes over a parchment-lined baking sheet. Spoon glaze over tops, and let stand until set. Serve glazed cupcakes immediately.

For the glaze:
Heat butter in a saucepan over medium heat until golden brown, about 10 minutes. Carefully pour butter into a bowl, leaving sediment behind.

Add sugar, vanilla extract, scraped seeds from one-half of a vanilla bean, and 2 tablespoons milk to butter, and stir until smooth. If glaze is too thick, add more milk. Use immediately.

Makes 29 cupcakes

Read More...

Saturday, November 8, 2008

Ginger Snaps Ala Martha


3 cups (420 grams) all purpose flour
1/4 teaspoons salt
3/4 teaspoon baking soda
2 teaspoons ground ginger
1 teaspoon ground cinnamon
1/4 teaspoon ground nutmeg
1/4 teaspoon ground cloves
1/2 cup (113 grams) unsalted butter, room temperature
1/2 cup (100 grams) granulated white sugar
1 large egg
2/3 cup (160 ml) unsulphured molasses

In a large bowl, sift or whisk together the flour, salt, baking soda, and spices. Set aside.

In the bowl of your electric mixer (or with a hand mixer), with the paddle attachment, cream the butter and sugar until light and fluffy. Add the egg and molasses and beat until well combined. Gradually add the flour mixture beating until incorporated.

Divide the dough in half, and wrap each half in plastic wrap and refrigerate for at least two hours or overnight.

Preheat oven to 350 degrees F (177 degrees C) and place rack in center of oven. Line 2 baking sheets with parchment paper and set aside while you roll out the dough.

On a lightly floured surface, roll out the dough to a thickness of about 1/4 inch. Use a cookie cutters to cut out the cookies. With an offset spatula lift the cut out cookies onto the baking sheet, placing the cookies about 1 inch (2.54 cm) apart. If you are hanging the cookies or using as gift tags, make a hole at the top of the cookies with a straw or end of a wooden skewer.

Bake for about 6-8 minutes depending on the size of the cookies. Small ones will take about 6 minutes, larger cookies will take about 8 minutes. They are done when they are firm and the edges are just beginning to brown.

Remove the cookies from the oven and cool on the baking sheet for about 1 minutes. When they are firm enough to move, transfer to a wire rack to cool completely.

Read More...

Friday, November 7, 2008

Buttermilk Bread


1¼ cup buttermilk
2 T butter, cut into small pieces
¼ teaspoon salt
2 T sugar
1 T wheat germ
2⅔ cup bread flour
⅓ cup semolina flour
1 teaspoon bread machine yeast

Add ingredients to bread machine as directed.

Set at white or regular setting (for light crust). Check for dough consistency after 5 minutes.

Makes one 2-pound loaf

Read More...

Tuesday, November 4, 2008

Making Environmentally Sound, Cheap Maple Syrup And Heating Your Home

40 gallons of maple sap boils down to 1 gallon of syrup


This and some maple trees, and I'm all set.

Read More...

Coconut Cake, Another Way


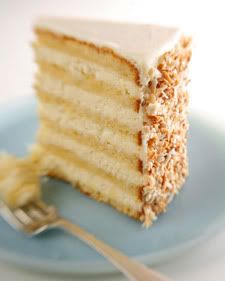
This is the recipe for the coconut cake that Bobby Flay made when he won the challenge to the Plantation Grill's chef, Robert Carter.

Toasted Coconut:
2 cups sweetened flaked coconut

Coconut Simple Syrup:
1 1/2 cups water
1 tablespoon granulated sugar
3/4 cup sweetened flaked coconut

Coconut Custard:
3/4 cup whole milk
3/4 cup unsweetened coconut milk
1/2 vanilla bean, seeds scraped
4 large egg yolks
1/3 cup granulated sugar
3 tablespoons cornstarch
2 teaspoons coconut rum (recommended: Malibu)
1/2 teaspoon pure vanilla extract

Coconut Filling:
3/4 cup coconut custard (recipe above), cold
3/4 cup very cold heavy cream

Coconut Buttercream:
3 stick unsalted butter, softened
1/3 cup confectioners' sugar
3/4 cup coconut custard (recipe above) (cold)
Pinch fine sea salt

Cake:
2 tablespoons softened butter, for pans
2 1/4 cups cake flour, plus more for pans
1 cup whole milk, at room temperature
6 large egg whites, at room temperature
1 vanilla bean, split and seeds scraped
1/2 teaspoon pure vanilla extract
1 3/4 cups granulated sugar
1 tablespoon plus 1 teaspoon baking powder
1 teaspoon fine sea salt
12 tablespoons unsalted butter, cut into 12 pieces, slightly cold

For the toasted coconut:

Preheat oven to 325 degrees F.

Spread the coconut evenly onto a baking sheet and toast until lightly golden brown, stirring once, 8 to 10 minutes. Turn off the oven and let the coconut sit in the oven until very dry and crunchy, about 15 minutes longer.

* * * * * * * * *

For the simple syrup:
Bring water and sugar to a boil. Stir in the coconut, remove from the heat and let sit for at least 30 minutes and up to 4 hours. Strain the liquid into a clean saucepan, bring to a boil and let cook until the mixture is slightly reduced, about 5 minutes. Let cool.

* * * * * * * * *

For the custard:
Combine the milks and vanilla bean and seeds in a medium nonreactive saucepan and bring to a simmer over low heat.

Whisk together the yolks, sugar and cornstarch in a large bowl. Slowly whisk the warm milk into the egg mixture then return the mixture to the pot over medium heat and bring to a boil, whisking constantly, until thickened. Scrape the mixture into a bowl and whisk in the rum and vanilla extract. Let cool to room temperature then cover with plastic wrap and refrigerate until cold, at least 2 hours.

* * * * * * * * * *

For the filling:
Combine the custard and cream in a bowl and whip until soft peaks form.

* * * * * * * * * *

For the buttercream:
Beat the butter and sugar in a stand mixer fitted with the paddle attachment until light and fluffy, about 4 minutes. Add the coconut custard and salt and beat until combined and smooth.

* * * * * * * * * *

For the cake:
Preheat oven to 350 degrees F. Butter and flour 2 (9 by 2-inch) round cake pans and line bottoms with parchment paper.

Whisk together the milk, egg whites, vanilla bean seeds and vanilla extract in a medium bowl.

In the bowl of a mixer fitted with the paddle attachment, mix together the flour, sugar, baking powder and salt. With mixer running at low speed, add the butter, one piece at a time and continue beating until mixture resembles moist crumbs. Add all but 1/2 cup of milk mixture to crumbs and beat at medium speed until the mixture is pale and fluffy, about 1 1/2 minutes. With mixer on low speed, add remaining 1/2 cup of the milk mixture, increase speed to medium and beat 30 seconds more. Scrape sides of bowl and mix for 20 seconds longer. Divide the batter evenly between the cakes pan and smooth the tops using a rubber spatula.

Bake until a toothpick inserted into the center comes out with a few crumbs attached, 22 to 24 minutes. Cool in the pan on baking rack for 10 minutes. Run a small knife around the side of the pan and invert cakes onto the baking rack, removing parchment paper, and let cool completely, about 45 minutes.

* * * * * * * * *

To Assemble:
Using a long serrated knife, slice each cake horizontally into 2 layers. Reserve 1 of the flat bottom layers for the top of the cake. Place another layer on a cardboard round cut side up and brush with some of the coconut simple syrup. Spoon 1/3 of the coconut filling onto the cake and using a small offset metal spatula, spread it into an even layer, leaving a 1/2-inch border around the edge of the cake. Repeat with 2 more layers. Brush the cut side of the reserved cake layer with the remaining syrup. Place the layer cut side down on top of the cake.

Frost the sides and top of the cake with the buttercream. Pat the coconut onto the sides of the cake and sprinkle the remaining coconut on the top of the cake.

******************************************************************

Comments from viewers of the Food Network who actually made the cake:

Kim wrote: "Wonderful!!!" *****

I was looking for a Coconut cake recipe and came across it one, I'm glad I did! I made this friday and yes it takes 4+ hrs but it's worth it. I couldn't believe how light it was. I did make one addition to the recipe i added coconut extract to the cake. My friends raved over it and asked when I'll be making another one.


Lauren wrote: "A Showstopper!" *****
This cake takes much time and effort, but it is wonderful. Perfectly balanced flavor, not too dense, but absolutely satisfying. I chose to make this cake because almost every single review had nothing but good things to say about this cake. I did add more powdered sugar to the buttercream, but everthing else you should follew to a T. Such a great cake! I can never keep it around, it is usually eaten up on the same day that I make it.


Pam wrote: "Wedding Rehearsal Dinner Surprise" *****
I made this cake to surprise my daughter and son in law for their rehersal dinner and WOW ...the best and hardest cake I ever made but sooooo worth it. Delicious , moist , coconutty , yummmm!!! As long as you have the time and make sure you have all the ingredients you and your guests will not be disappointed. I keep getting requests from family to make it again and again!


Norma wrote: "Sinfully light and devilishy delicious" *****
I made this for desert on New Year's Day, the whol family was amazed at how light this cake was. I applied all the ingredients in the recipe but simplified the directions by making the filling first so it will be cooled down. Next I made the simple syrup and set it aside to cool down. Then I made the cake by mixing the dry ingredients in a bowl, then mixing the wet ingredients starting with mixing the sugar with the butter first then adding the eggs, mixing well, then added the rest of the wet ingredients, mixing well and adding the dry ingredients to the wet mix and mixed it well with my mixer and then baked it according to Bobby's instructions. I made the cake, filling and simple syrup a day ahead then finished the cake the next day. It was amazing.


Katalin wrote: "Too much baking power" **
Well... this cake tasted like baking powder with some light coconut flavor. One tablespoon +one teaspoon of baking powder is too much. I am absolutely amazed that in the 45 reviews- I read before wasting my time with this concoction- no one mentioned anything about the fact that you can taste the baking powder in the cake. Bobby?s ?famous? coconut cake ended up in my trash can and I learned my lesson to trust myself and NOT to use a recipe that is created by a chef who is NOT a baker.


Jessica wrote: "The best coconut cake ever" *****
I am a skilled baker for my age. I would not suggest this recipe if you're into simple, but if you want something truly decadent and you love coconut, there is no better recipe. This takes about four hours to make, but for special occasions it is so worth it. This cake really looks and comes out like the picture. The cake is super moist. Also, never make it without the real vanilla bean seeds, it makes the recipe. If you love fabulous cake, this recipe is the only way to go. I've made it three times already and everywhere I go with it I get non-stop complements.


Samantha wrote: "Wow, it was good" ****
I read the reviews after making the cake, but if you are reading the reviews before making the cake, listen to them! Most everyone hit everything right on. It was a HUGE hit! I had to change the frosting, as most people did. I added 1 tsp. coconut extract and 1 tsp. vanilla extract and 1/3 more sugar. Bobby's frosting was not great- too much butter. I also did not use the vanilla bean, I just added 1 tsp. vanilla extract. However, the cake and filling are absolutely perfect! Here are some tips 1. Make the custard and simple syrup a day early. If you like a lot of filling; double the custard, but it really is not necessary. 2. Note: you will divide the custard. So it's easier if you go ahead and separate it while it is hot. 3. Keep an eye on the toasted coconut, it toasts up very fast. I only needed about one cup of the toasted coconut.


Marlene wrote: "All That Was Left Was a Lonely Fork" *****
This coconut cake was wonderful. Thank you Bobby. Just the cake alone without frosting was moist and delicious. I followed the recipe exactly. I do recommend using parchment in the pans for easy removal. I also recommend mixing the Malibu rum with a little bit of 7up and having it as a cocktail while making this cake. Made dinner at the in-laws much more enjoyable. This cake took all morning to make, but was well worth it. It was devoured quickly. Family even bypassed the towering chocolate cake with ganache to try the coconut cake - even the little ones. The toasted coconut looks and smells too inviting to resist. Thanks again! This is a good one and it is replacing all my other coconut cake recipes.


Linda wrote: "SOOOO GOOD!!!" *****
A few years ago I dined at the Peninsula Grill in Charleston, SC and had the famous coconut cake....it was wonderful. When I saw Bobby Flay's Throwdown challenging this coconut cake, I just had to tune in. The fact that Bobby beat this cake was enough reason for me to try his recipe. HOLY MOLY.....my husband and I have made it 3 TIMES since the show aired!!! It is really good but quite time consuming to prepare but this cake does not disappoint!"


null wrote: "You have to try this cake" *****
I watched this episode of Throwdown in August and knew I was going to make it for Thanksgiving this year. I have to say it is time consuming and can get a little confusing if you are cooking several things at once. The recipe should tell you clearly that you should divide the custard. I was going right down the directions and mixed all custard with the cream. I ended up adding another half a cup of cream and doubled the rum. For the frosting I made a buttercream frosting with cream cheese, butter, powdered sugar and coconut flavoring. I also did not use the vanilla bean, but added a little extra vanilla extractin place of it. Be careful toasting the coconut. I burned two batches after the oven had been turned off. I place the last batch in the preheated oven for about 4 minutes, tossing once and then turned the oven off and it was perfect. This cake was a big hit and well worth the time and love. Delicious!


Sandi wrote: "BEST CAKE EVER" *****
Follow the recipe to a T and you will be the hit of the party. It takes a good 1/2 a day to make this cake but totally worth it. I served this cake at a dinner party after making it for the first time (always a bit terrifying) and it was gone by the next day. It's not too sweet, the cake it light, the cream/custard filling perfect and the frosting is on the money. Really 'bloody' good cake... pep


Susan wrote: "Incredible" *****
this cake was awesome - my only problem is that i found that the custard wasnt enough for the cake - it was a bit skimpy - next time i will double the custard filling -


Leo wrote: "Dream Coconut Cake" ****
I love this recipe - very time consuming, but it's worth it! If you love the taste of coconut, this is the cake for you! However, I just could never bake a cake that is spongy, even though I follow exactly what the recipe calls for - maybe I will try a cake mix next time ...will save me a bit of time, and will know that it will come out moist no matter what. As for the filling and the buttercream, WOW it is the best!!!


Sherilyne wrote: "Family favorite" *****
Fantastic! My sons told me to forget the pumpkin pie for Thanksgiving and make the coconut cake again.


Nancy wrote: "best cake ever" *****
I have made this cake several times. It is very time consuming, but well worth it. My family has decided this will be our traditional birthday, Christmas and any other holiday cake.


Kathy wrote: "Worth the Time to make" *****
I had an afternoon to wait for a delivery to my home so i decded to make this cake ...WOW WAS IT GREAT!!!!!!!!! it is labor intensive but well worth it...that layer of tosted coconut inbetween each layer and the lightness of it ...crazy good....I also froze one and just didn't put the coconut on the outside till i was ready to serve it and it was PERFECT...YOU GOTTA TRY THIS CAKE... OK BOBBY...THIIS HAS TO GO ON THE MENU IN ONE OF YOUR NYC RESTAURANTS ...PLEASEEEEEEE


Meredith wrote: "Coconut Heaven!" *****
This cake took a very long time to make, and yes, the recipe could be written a little bit better. However, the results were both delicious and beautiful to look at. (Mine actually came out less homemade looking than Bobby's, with no mound in the middle!) I followed the recipe exactly, and it produced one of the lightest, moistest cakes I have ever eaten. I made it for a dinner party I threw for a few friends, and everyone had seconds--and talked about it the whole rest of the night. The only modification I would make for next time is that I would take a cue from Bobby's throwdown opponent and use cream cheese frosting. The butttercream actually had too much butter flavor, although it was certainly helped by the toasted coconut on the outside. I personally love cream cheese frosting, so I will stick it on just about anything!


Colleen wrote: "Excellent!" *****
My husband loves coconut cream pie and after seeing this cake on Throwdown he requested it for his birthday. I had very few problems making it. After reading the other reviews I doubled the coconut filling but I really didn't need to. I think the original recipe would have been enough. I did add a little coconut extract and I used pure vanilla extract instead of vanilla beans (they were small and way too expensive). My cake did fall slightly in the middle but you couldn't tell after it was cut in half, filled and iced. I did add a little extra powdered sugar to the buttercream, about 1 cup. It was wonderful! Everyone loved it and my husband ate two pieces! This recipe is a keeper!


Phillip wrote: "Coconut Nirvana" *****
I have made this cake twice, once after watching the throw-down for a friend's birthday, and again this week for someone who had to leave the first birthday party early and didn't get any of the cake. This is probably one of the top 5 cakes, of any kind, I've ever had or made, and I come from a long line of family bakers. It is not too sweet, extremely moist, and has coconut flavor in every layer. It's not difficult to make, just time consuming. I've made it over 2 days each time. However, there are adjustments to be made to the recipe: 1. I agree with previous posters that you need to double the coconut creme. I added a bit of coconut extract to the creme (about 1/2 tsp). 2. For the filling, I used a double recipe of coconut creme, (1 1/2 Cups)and doubled the whipping cream to 2 Cups. I whipped the cream separately, added about 1/2 tsp coconut extract, and folded it into the creme. I popped it back into the fridge until I made the cake the next day. 3. The buttercream frosting: I used the 3/4 Cup of coconut creme called for, but had to use about 3 Cups of powdered sugar to get this to a proper buttercream frosting consistency. I added about 1 tsp of coconut extract to this as well. An added bonus to doubling the coconut creme recipe is you have some of it left over for noshing if, like me, you let the birthday girl take home the rest of the cake. One small note: the instructions tell you to butter and flour the pans and then line the bottoms with parchment paper. The normal procedure, which I used, is to butter the pan, line with parchment paper, butter the paper, and then dust with bottom and sides with flour.


Anonymous wrote: "Coconut Cake" *****
One of the best cakes I have ever tasted!!


Anonymous wrote: "Excellent!!" *****
This cake deserved to win the throwdown. It was delicious. A little time consuming to make, but it is well worth the time and effort!!! I only wish they gave the ingredients by weight, because I like to weigh my ingredients when baking a cake.


Deneen wrote: *****
This has got to be the best coconut cake I ever ate; I'm not sure where everyone had problems with the amount of the ingredients; I had filling left over as well as toasted coconut; I do agree that 10 minutes is a bit long to toast the coconut and the icing is a matter of taste - we loved the cake including the icing. I feel that it was worth the time to make the cake; It will definately be repeated; My only issue with the cake is that my stand mixer is not a Kitchenaid so therefore I don't have a paddle attachment; I had to use the beaters;


Donna wrote: "Excellent cake!" *****
This cake is wonderful, it is involved but worth the effort."


Lisa wrote: "The competition cake might have been great, but...." **
My hubby and I have become slightly addicted to Throwdown, but this is the first recipe from the show that we've attempted. My hubby is an excellent baker, well known by friends and colleagues for his ability. He made this cake for my birthday and though the end product isn't done, I'm so frustrated for him that I created an account just to rate this particular recipe. Other reviewers have identified all of the mistakes in the recipe. IF (big IF) we attempt to make this cake again at our house, the other change I would recommend is to first beat the whipped cream into soft peaks and then fold in the custard to create the filling. This is a classic technique and is typically the way whipped cream or egg whites are combined with heavier ingredients. Also, I might suggest adding some coconut extract as I'm hoping for a complete coconut experience, but I haven't yet tasted the final product. I gave this recipe a two star rating for the problems with the recipe especially given the time and cost invested to create the final product.


Shalini wrote: "Crowd Pleaser!" *****
Everyone that tasted this cake was amazed and in love. I even got a marriage proposal (true story). One person tried to take the whole cake for themselves. I've had to make this cake multiple times for parties upon requests.


Anonymous wrote: "Flippin' Awesome" *****
Of course, I changed a few things to my taste I used an old family recipe and some of bobby's but, I baked this for my father's birthday and it was a HUGE hit! Coconut is his favorite cake and I had a hard time finding a place to order a coconut cake that tasted great. Trust me, it is worth the time and effort. Everyone can't wait for the next one and people who didn't even like coconut loved it. Just some advice make the simple syrup and custard a day before hand and the next day is a breeze. Love it, love it, love it!


S wrote: "Just too YUMMY!" ***
This cake is wonderful! (I'd like to know how to convert this to a waiste friendly recipe) I too had to make a couple adjustments with the simple syrup and the frosting. I thought it was heavier on the vanilla flavor than coconut. I didnt feel the need to double the custard or cream filling mine made plenty. I sliced this cake into 12 servings(slicing it as you would any round cake). Here is the breakdown of calories and fat in this recipe(Hate to break anyones bubble, but put your sneakers on if you're going to eat this) 826.5 calories; 50.+g Fat; 81+g Carb. Perhaps different brands of ingredients differ in Nutritional content, but this is what mine came out to.


Vanessa wrote: "Great recipe" *****
A lot of work but really worth it. I really hope everybody gets encouraged and tries it! Great job Bobby keep up with the great recipes.


Anonymous wrote: "There's A Problem With The Buttercream" ***
There's a problem with the buttercream frosting portion of the recipe. I think the butter measure is off. I used three sticks of butter with 3/4 cups custard and 1/3 cup confectioners' sugar and all I got was sweet butter. It's too much butter. I'm going to re-do it starting with 3 tablespoons of butter, that seems more proportionate with other buttercream frostings i've made. We'll see how that goes...


Kay wrote: "What a disappointment!" **
How this cake won the Throwdown for a coconut cake is beyond me, it did not have very much of a coconut flavor. The cake was delicate, but vertually flavorless. The amount of time that went into this was also a negative point. I would have ranked the cake a 3 star otherwise. Being from the south for the majority of my adult life, there is no way I would have ranked this as a coconut cake. I believe the frosting recipe has some errors in it. 3 sticks of butter to 1/3 cup of confectioners sugar is crazy, even with the custard added to it. The frosting tasted like sweetened butter and not frosting at all. My sister also made this cake and agrees with me on the results. I would not recommend this recipe to anyone.


Leticia wrote: "Worth the effort" ****
I first read the reviews before trying this cake. I've been looking for a new coconut cake recipe for my family. While there were some issues with the other reviewers on the syrup and buttercream, I decided to make the cake as it was written and then see what I needed to change. Well, I disagree with the simple syrup. It didn't need more sugar. The sweetened coconut provides enough, plus the 1 tsp/tbls of sugar. I thought it was just fine. Actually, the cake was so fabulous and moist, that it would even work without it. I will have to agree that the buttercream frosting was a little to buttery for me. I did add more powered sugar. For the next version, I will make a cream cheese frosting, but still add the custard to it as in the recipe, because that was a nice touch. Overall, an excellent cake. I will use the cake recipe (minus the cocounut milk) for all my white cake recipes because it is that good.


Judy wrote: "Did not live up to expectations" ***
The cake and custard in this recipe were very good, but the icing was wretched. It was mostly butter and tasted like a buttered cake. I might make the cake again but I would definitely find an alternative to the icing.


null wrote: "fabulous when corrected" ****
I have made this cake three times. I saw the throwdown and then promised to make the cake for a friend's birthday the following week. Fortunately, I made a practice cake. The simple syrup directions are incorrect, but I figured that out and fixed it. The frosting was like flavored butter, so I adjusted it by adding about two cups of powdered sugar and some vanilla and coconut extract. I could tell there wouldn't be enough custard, so I doubled that amount. I also didn't use as much cream in the custard filling. When I made the third cake, I added coconut to the custard filling. It was yummy, but not as moist as versions one and two (maybe the right amount of cream would fix that). I was happy to read that everyone else had to adjust the recipe as I am not much of a baker and was a bit unsure. After all the adjustments and corrections, it is the most delicious coconut cake EVER. I love the toasted coconut on the frosting, the light cake, and the delicious custard filling. I will make this cake my very own special occasion cake from now on.


aspen wrote: "Perfect" *****
This cake is awesome! It does take a lot of time...but it is worth it! With the simple syrup; I added the TBSP of sugar in the beginning and after straining the coconut out I measured the liquid and added an equal amount of sugar (about a cup) and boiled again (how you make regular simple syrup)


Liz wrote: "Amazing" *****
By far the best coconut cake I have ever had. I followed the recipe as written, but made a double batch of the coconut custard and coconut filling. Only drawback is it does take as long to prepare as shown but definitely worth the effort.


Darlene wrote: "Wonderful but messy" *****
I made this for dessert last night and it was a hit with all the adults, but not so much with my teenage son. It wasn't "sweet enough" for him. Which is exactly why we all loved it. It's very moist and creamy with a subtle but complete coconut flavor. The only problem I had was that my cakes sunk in the middle so when I cut them, they were very thin in the middle. So, I took the two thickest pieces and made them the top and bottom and put the thinner ones in the middle. Not beautiful, but very, very tasty. Definitely a repeat recipe in our house.


Lynne wrote: "OMG! I'M IN COCONUT HEAVEN..." *****
This cake is incredible. Lovely, delicate coconut flavor that is not overpowering or overly sweet. I had my doubts about the frosting at first (it was very buttery and not very sweet) but once topped with the sweetened toasted coconut-it was DIVINE! The recipe does take a bit of time, but well worth it. I did get confused on the Coconut Simple Syrup (it's a bit unclear on when to add the sugar.) I added the sugar during the second boil after the coconut was added. Bobby, you have out done yourself with this cake!


Michelle wrote: "TOO many typos!!" ***
I have to agree with what others have written here. The cake and filling were delicious, but the buttercream frosting, had I followed the actual recipe, was just sweetened butter, I had to add a lot more powdered sugar to make it into frosting. The coconut toasting instructions were off as well, too long and too hot of an oven! And of course the simple syrup you can tell is missing the second amount of sugar. If you know what you are doing, or where to look to fix the errors, this could be an awesome cake!


Sylvia wrote: "Does FN ever REPRINT Recipes?"
I was reading the reviews on bobby flay's coconut cake and there seems to be quite a few errors. Does the Food Network ever REPRINT recipes such as these (I've seen others)? And do they state on the recipe that it is a "REPRINT". Might be a suggestion some of us should make The misprints/errors on this recipes has discouraged me from baking would would seem a wonderful cake. The recipe writer/proofer gets one star.


Geraldine wrote: "excellent tasting" *****
This is one of the best tasting cakes I have ever made. However in the syrup instructions, I believe there is an error in the paragraph, in the way it is written.


Michelle wrote: "Hmmmm.." ***
Bobby, I love ya, but this cake was not worth the time and effort. It was a LOT of work and the result was too sweet and buttery. I can't imagine how sweet your competition's cake was, since yours was "lighter". It might just be a regional thing. Perhaps this is perfect for a southern dessert. Just too much for this CA gal! :)


Eileen wrote: "Outstanding cake" *****
A dear friend made this cake and shared it with us. In my 70 years of cake eating, I have to rate it the very best I have ever devoured. Moist, tasty, not to sweet, tho she did change the icing as her hubby dislikes buttercream icing. I am going to try my hand at the recipe. My friend could win blue ribbons on this one.


Cece wrote: "MMMMMGood" *****
I made this cake for 4th of July and it was a hit! It was moist, light and full of flavor. I too wondred about the simple syrup but I followed Julee's direction below to add 1 cup of sugar and it worked out fine.I made two cakes, and came home with nothing. It is one of the best cakes out there if executed prop


Ersilia wrote: "they need to rewrite the recipe" ***
When I saw this cake on throwdown I knew I was making it for July 4th- what could be more American ? Whoever wrote this recipe did it too quickly and did not test it. I had to go back to the store to buy more coconut to toast-- it only needs 8 minutes and leave it in the oven AJAR for an additional 5 minutes only. (My 1st batch was so overly toasted it had no coconut taste left.) I let the simple syrup base seep for 4 hours and it still didn't have that good coconut flavor. I also knew that the quantities for the custard would only make 2 cups of custard and doubled it to compensate for the all the layers that needed to have filling. Finally there must have been a huge typo on the buttercream - I needed to use 2 cups of sugar for the 3 sticks of butter just to make it pallable. Good thing I had additional custard for the buttercream. I'm sure this cake was much more delicious when Bobby originally made it- especially if it beat that famous Charleston recipe- but THIS recipe does not appear to be done properly, because there is no way Bobby could have one with the one we were given to use---


Anonymous wrote: "Cake was great!" *****
Definitely worth the effort. I do consider myself an experienced baker but I had a lot of problems with the recipe. The time written for toasting the coconut is much too long. I did make the simple syrup even though there is clearly a discrepancy in the directions. And the buttercream was too thin, I had to add more confectioners sugar. After saying all that, the cake was delicious, light, and moist... All the things you want in a great cake.


JULEE wrote: "Worth the effort!" *****
I, too, wondered about the instructions for the simple syrup. However, I wanted to try the cake after watching this throwdown and since I was already well into my prep - I just looked up the basics on simple syrup and made this adjustment. Boiled the water and 1 tbsp of sugar. Added the coconut, strained it and then added another cup of sugar and boiled and reduced again. It was fine. The cake turned out amazingly well - worth the effort. I would definitely make it again.


Anonymous wrote: "Help" **
Anyone else see the problem with this recipe. For the coconut simple syrup it says to boil water and sugar, add coconut, strain and add sugar to water and boil until thick. Ingredients only show one amount for sugar. What are we missing????


Read More...

Coconut Cake, One Way

This is the 'Ultimate Coconut Cake' recipe from Charleston, South Carolina's Peninsula Grill that chef Robert Carter developed from his grandmother's recipe.

Prepare it along with him and Martha, or...


Ingredients for the complete cake:
2 cups sweetened shredded coconut flakes
2 Coconut Cake
Simple Syrup
Coconut Filling
Coconut Cake Frosting

* * * *
Ingredients for the cake:

Nonstick cooking spray with flour
1 pound unsalted butter, preferably European-style
3 cups sugar
6 large eggs
4½ cups all-purpose flour
1½ T baking powder
½ teaspoon salt
1½ cups heavy cream
1½ T pure vanilla extract
1 teaspoon coconut extract

Ingredients for the coconut filling:
5 cups heavy cream
3 cups sugar
1 pound (4 sticks) unsalted butter
¼ cup cornstarch
1 teaspoon pure vanilla extract
9 cups shredded sweetened coconut

Ingredients for coconut frosting:
1 cup (2 sticks) unsalted butter, room temperature
8 ounces cream cheese
1 teaspoon pure vanilla extract
5 cups confectioners’ sugar
1 vanilla bean, scraped

Ingredients for simple syrup:
¾ cup water
¾ cup sugar

Directions:
Preheat oven to 375 degrees.

Spread coconut flakes in an even layer on a parchment paper-lined baking sheet. Bake until golden, 5 to 7 minutes; set aside to cool.

Using a serrated knife, trim tops of cakes to make level; discard trimmings. Cut each cake into 3 even layers. Place four strips of parchment paper around perimeter of a serving plate or lazy Susan.

Place one layer on the cake plate. Brush with about one-fifth of the simple syrup. Spread over 2 cups of filling. Place a second layer on top. Repeat process with the next four layers and top with last remaining layer.

Spread top and sides of cake with frosting, keeping in mind you may not need to use all of it.

Press toasted coconut into sides of cake; remove parchment paper strips.

Chill cake at least 5 hours and up to 5 days. Slice immediately; bring to room temperature before serving.

* * * *

Directions for the cake:

Preheat oven to 325 degrees. Spray two 10-inch round cake pans with cooking spray; set aside.

In the bowl of an electric mixer fitted with the paddle attachment, cream together butter and sugar until light and fluffy, 5 to 6 minutes. Add eggs, one at a time, and beat until creamy, occasionally scraping down sides of the bowl using a spatula.

In a large bowl, sift together flour, baking powder, and salt. In a small bowl, mix together cream, vanilla, and coconut extract. With mixer on low speed, add flour mixture, alternating with cream mixture, beginning and ending with flour; beat until just combined.

Pour batter into prepared cake pans and bake until a toothpick inserted into the cake comes out clean, 40 to 45 minutes.

Let cool completely on a wire rack before removing cakes from pans.

Directions for the coconut filling:
Place cream, sugar, and butter in a medium saucepan and bring to a boil over medium-high heat, stirring occasionally until sugar is dissolved.

Meanwhile, in a small bowl, mix together cornstarch, vanilla, and 1 tablespoon water. Add to cream mixture, bring to a boil, and simmer until thickened, about 1 minute.

Place coconut in the bowl of a food processor. Pulse until coconut is finely chopped. Remove cream mixture from heat and stir in coconut until well combined. Transfer to a large baking dish; let cool.

Cover filling with plastic wrap and chill overnight.

Just before using, place mixture in the bowl of an electric mixer fitted with the paddle attachment. Beat until smooth and creamy, 4 to 5 minutes

Directions for coconut frosting:
Place butter and cream cheese in the bowl of an electric mixer fitted with the paddle attachment; beat until creamy.

With mixer on low speed, slowly add vanilla extract, seeds from vanilla bean, and confectioners’ sugar. Continue beating until smooth and creamy, about 3 minutes.

Directions for simple syrup:
Place water and sugar in a medium saucepan over medium-high heat. Bring to a boil, stirring occasionally, until sugar has dissolved. Remove from heat and let cool.

Makes one 6-layer cake

Read More...

Monday, November 3, 2008

Duck (Duk) Sauce

5 cups coarsely chopped mixed fruit (apples, plums, and pears)
1 cup water
3/4 cup apple juice
1 teaspoon soy sauce
1 T apricot preserves
1/2 cup packed light brown sugar
1/2 teaspoon garlic powder
1/2 teaspoon dry mustard


Place fruit in a stock pot over medium high heat. Add water, apple juice, soy sauce, apricot preserves, brown sugar, garlic powder, and dry mustard. Bring to a simmer, stirring frequently to dissolve brown sugar. Reduce heat, and continue simmering for 40 minutes, or until fruit is completely soft. Remove from heat and allow to cool.

Blend sauce in a food processor or blender until completely smooth, adjusting consistency with additional water, if desired. Cover, and refrigerate until ready to use.

Read More...

Ginger Soy Dipping Sauce

3 teaspoons peeled and grated fresh ginger
1/2 cup (4 fluid ounces) light soy sauce
2 T Thai sweet chili sauce


Combine ginger, soy sauce and chili sauce and mix well.

Makes 2/3 cup or 5 fluid ounces

Read More...

Flower Dumplings, aka Sui Mei

1 lb. ground (minced) chicken
6 canned water chestnuts, drained and finely chopped
1 small carrot, grated
2 scallions (shallots/spring onions), finely chopped
1 teaspoon peeled and grated fresh ginger
1 teaspoon Asian sesame oil
1 teaspoon rice wine
1 teaspoon soy sauce
1 teaspoon salt
2 teaspoons sugar
2 T cornstarch (cornflour)
24 wonton wrappers

Combine ground chicken, water chestnuts, carrot, scallions, ginger, sesame oil, rice wine, soy sauce, salt, sugar and cornstarch in a bowl. Using wet hands, mix until well combined.

Place wonton wrappers on work surface and cover with a damp kitchen towel. Working with one wrapper at a time, lay it on the work surface and place 3 teaspoons of chicken filling in the center. Gather edges around filling, forming a basket, and gently squeeze center of dumpling to expose the filling at the top. Tap bottom of dumpling on work surface to flatten. Cover with plastic wrap and set aside. Repeat with remaining wonton wrappers.

Line a medium bamboo steamer with parchment. Half fill a medium wok with water (steamer shold not touch water) and bring to a boil. Arrange filled wontons in steamer, cover and place steamer over boiling water. Steam for 12 minutes, adding more boiling water to wok when necessary. Lift steamer off wok and carefully remove dumplings. Serve warm with soy sauce or ginger soy dipping sauce.

Read More...

Golden Shrimp Balls, Another Way

1 cup shrimp shelled and deveined
1/4 cup water chestnuts
1/4 cup scallions
1 T minced garlic
1 T minced ginger
1 T dry sherry
1 teaspoon red chili flakes
1 T sesame oil
1 teaspoon salt
2 egg whites
1 T canola oil
1/2 cup cornstarch
1/4 cup panko bread crumbs
4 cups peanut oil for frying

Chop the shrimp finely and place in a large bowl. If using canned water chestnuts, rinse them well. If using fresh, peel them. Chop the water chestnuts finely, and add them along with the scallions to the shrimp. Add the garlic, ginger, sherry, chili flakes, sesame oil, salt, egg whites, and canola oil to the bowl and mix well. Form mixture into walnut-sized balls.

Mix the cornstarch and breadcrumbs in a shallow bowl. Drop a shrimp ball into the breadcrumb mixture and toss to coat well. Place coated balls on a sheet pan lined with parchment paper and set aside.

In a deep pan heat the peanut oil to 350 degrees F. Drop the shrimp balls in a few at a time and fry until golden. Drain on paper towels and serve immediately with Chinese mustard dipping sauce.

Read More...

Chinese Mustard Dipping Sauce

1 cup Dijon mustard
2 T hoisin sauce
1 T rice wine vinegar
1 teaspoon chili sauce
1 T water

Whisk together all of the ingredients in a bowl.

Read More...

Golden Shrimp Balls, One Way

12 slices of day-old white bread
16 ounces jumbo shrimp (green king prawns), peeled and deveined
6 canned water chestnuts, drained and finely chopped
2 ounces bacon, finely chopped
1 teaspoon granulated sugar
1/2 teaspoon salt
2 teaspoons cornstarch (cornflour)
3 cups vegetable oil for deep-frying

Remove crust from bread. Cut bread into 1/4-inch cubes. Spread out on a tray and allow to dry at room temperature.

Flatten shrimp with the back of a cleaver, then finely chop. Combine the shrimp, water chestnuts and bacon in a bowl and stir in the sugar, salt and cornstarch. Mix well, and cover and chill for 30 minutes.

Roll 1 tablespoon of shrimp mixture in bread cubes to coat. Repeat with remaining mixture. Heat oil in a large wok or saucepan until it reaches 375 degrees F on a deep-frying thermometer, or use a small bread cube dropped in the oil sizzles and turns golden.

Working in batches, add shrimp balls and fry until golden, 1-2 minutes. Using a slotted spoon, remove from oil and drain on paper towels.

Serve hot with sweet and sour sauce, or Chinese mustard dipping sauce.

Read More...

Steamed Pork Buns

For the dough:
1 1/2 teaspoons active dry yeast
1/2 cup (4 fluid ounces) warm water
1/4 cup superfine (caster) sugar
1 cup (4 ounces) all purpose flour
1/2 cup (2 ounces) self-rising flour
3 teaspoons butter, melted

For the filling:
2 T vegetable oil
3 teaspoons peeled and grated fresh ginger
2 cloves of garlic, chopped
1 T hoisin sauce
1 T oyster sauce
1 T soy sauce
1 teaspoon Asian sesame oil
3 teaspoons cornstarch (cornflour) mixed with 1 T water
8 ounces Chinese barbecue pork, finely chopped
6 scallions (shallots/spring onions), finely chopped

To make the dough, in a small bowl combine yeast with 2 tablespoons warm water, 1 teaspoon sugar and 1 teaspoon all-purpose flour. Mix until well combined. Cover with a kitchen towel and let stand in a warm place until frothy, about 15 minutes.

Sift remaining all-purpose and self-rising flour into a large bowl. Add remaining sugar, yeast mixture, remaining warm water and melted butter. Using a wooden spoon, mix to form a soft dough. Turn out onto a floured work surface and knead until smooth and elastic, 3-5 minutes. Place dough in a large oiled bowl, cover and let stand in a warm place until doubled in bulk, about 1 hour.

To make filling, heat oil in a wok or frying pan over medium heat and fry ginger and garlic until aromatic, about 1 minute. Add hoisin sauce, oyster sauce, soy sauce and sesame oil. Cook, stirring, for 2 minutes. Add the cornstarch and water mixture, bring to a boil and stir until sauce thickens, about 2 minutes. Remove from heat and stir in pork and scallions. Transfer to a bowl and allow to cool completely.

Punch down dough. Turn out onto a floured work surface and knead until smooth, about 5 minutes. Divide dough into 16 pieces and roll or press out each piece to form a 2 1/4-inch circle. Cover dough with a damp kitchen towel. Working with one round of dough at a time, spoon 2 teaspoons of filling into the center. Gather edges together, twist to seal and cover with a kitchen towel. Repeat with remaining dough.

Cut out 16 squares of parchment and place buns, sealed side down, on paper. Half fill a medium wok with water (steamer should not touch water) and bring to a boil. Working in batc hes, arrange buns in steamer, cover and place steamer over boiling water. Steam for 15 minutes, adding more boiling water to wok when necessary. Lift steamer off wok and carefully remove buns. Using scissors, snip the top of each bun twice, to resemble a star. Serve warm with soy, hoisin and/or duck sauces.

Makes 16 buns

Read More...

Barbecued Pork, Chinese Style

This recipe can be used in dishes where Chinese barbecue pork is required, like bao, aka steamed pork buns.

2 pork filets, 12 ounces each
3 T hoisin sauce
3 T ground bean sauce
2 cloves garlic, crushed
1/4 teaspoon Chinese five-spice powder
3 T soy sauce
1 T brown sugar

Optional: pinch of Chinese red food coloring powder

Place pork filets in a shallow dish. Combine hoisin sauce, ground bean sauce, garlic, five-spice powder, soy sauce, red food coloring and brown sugar, and mix well. Pour over pork and toss until well-coated in marinade. Cover and refrigerate overnight.

Preheat oven to 350 degrees F.

Drain pork and reserve marinade. Place pork on a wire rack over a baking dish. Bake for 30 minutes, basting with marinade and turning pork during cooking. Remove from oven and allow to stand for 10 minutes before slicing. Serve hot or cold.

Makes 8 small servings.

Read More...

Saturday, November 1, 2008

Dia de las Muertos (Day of the Dead) Cookies

Vanilla Cookie Dough
2 cups all-purpose flour
½ teaspoon baking powder
¼ teaspoon salt
8 T (1 stick) unsalted butter, softened
1 cup sugar
1 egg
1½ teaspoons vanilla extract

Chocolate Cookie Dough
1 cup all-purpose flour
½ cup unsweetened cocoa powder, Dutch process
¾ teaspoon ground cinnamon
½ teaspoon baking soda
¼ teaspoon baking powder
⅛ teaspoon salt
8 T (1 stick) unsalted butter, softened
½ cup (packed) brown sugar, lump free
½ cup granulated sugar
1 egg
1 teaspoon vanilla extract

Preparing the vanilla dough:
Mix the flour, baking powder, and salt together with a whisk or a fork. Set aside.

In a large mixing bowl, beat the butter and sugar with an electric mixer until light and fluffy, 3 to 4 minutes.

Beat in the egg and vanilla. On low speed, beat in the flour just until incorporated.

Form the dough into a log about 2 inches in diameter and set aside.

Preparing the chocolate dough:
Mix the flour, cocoa, cinnamon, baking soda, baking powder, and salt together thoroughly with a whisk or fork. Set aside.

In a large mixing bowl, beat the butter, brown sugar, and granulated sugar with the back of a spoon or an electric mixer until smooth and creamy but not fluffy (less that 1½ minutes with an electric mixer).

Beat in the egg and vanilla.

On low speed, beat in the flour mixture and mix just until incorporated.

Form dough into a log the same length as the vanilla log. If the dough is too soft and sticky to handle place it in the freezer to firm.

To shape the skulls:
Reshape each log of dough so that it is skull shaped rather than round: make one side narrow for the chin and jaw and leave the other side wide for the cranium.

Wrap and refrigerate the chocolate dough.

Cut the vanilla dough in half for easier handling in this next step. Form features in the vanilla dough, using the handle of a wooden spoon to poke holes for eyes through the entire length of the log.

Form the nose with a skewer, poking two holes for nostrils.

Form the mouth by inserting a narrow table knife and wiggling it back and forth to lengthen and widen the opening.*

Wrap and refrigerate the vanilla dough. Chill both doughs at least 2 hours, preferable overnight.

*Don’t try for perfection: irregular holes make the best and weirdest skulls.

Position rack in the upper and lower third of the oven. Preheat the oven to 350 degrees.

Remember to keep the dough well chilled at all times.

Cut the chocolate dough* into ⅛-inch slices and place them at least 1½ inches apart on the lined baking sheets.

Cut the vanilla dough into ⅛-inch slices** and place 1 slice on top of each chocolate slice.

Bake until pale golden at the edges, 12 minutes, rotating the baking sheets from top to bottom and front to back halfway through the baking.

Slide parchment liners onto cooling racks or transfer the cookies directly from the pan to the rack with a metal pancake turner, waiting 1 to 2 minutes if necessary to let the cookies firm up before moving them.

Cook cookies completely before stacking or storing. Cookies keep at least 1 week in an air-tight container.

* Use dental floss or wire cutter to slice the dough.

** You will need to remake each face after you slice.

Variations:
For added sweetness and crunch, sprinkle large-grained sugar over the top of the cookies before baking.

The vanilla and chocolate doughs can be sliced and baked separately, cooled and made into sandwich cookies with a layer of melted chocolate, chocolate ganache or your favorite melted raspberry preserves in between. If using fruit preserves, I recommend that you leave the cinnamon out of the chocolate dough recipe.

Yields: 18-36, depending on size

Read More...

Followers of The Cook In The Family::

  © Blogger template 'Isfahan' by Ourblogtemplates.com 2008

Back to TOP